
Journey of doing Image Classification with Go and TensorFlow
Posted on October 24, 2021 • 13 minutes • 2621 words
Lets get the disclaimers out of the way first, I am not a ML engineer or have any experience with it I know some terms like CNN and phrases like supervised learning from sitting next to data scientists. But I am as clueless to this space as they are when I start talking about Docker, Kubernetes which I do a lot. I current maintain my own public gallery https://github.com/robrotheram/gogallery/ over the weekend I wanted to try and automatic image classification to or possibly some generate auto captions for the images. I saw in the way more popular google photo replacement PhotoPrism that they already have image classifications as well as other ML models. Both projects use the same language Go so it is useful starting point.
Most of the code for PhotoPrism classification can be seen here https://github.com/photoprism/photoprism/blob/develop/internal/classify/tensorflow.go
From what I can see from the code and reading other tutorials the process is fairly straight forward; Load a model, transform the image into a format the model is expecting, run it against the model, process the output.
But this hides so much complexity and even reading the above code there stuff that makes no sense on first reading for example:
//FROM Line 84
output, err := t.model.Session.Run(
	map[tf.Output]*tf.Tensor{
    	t.model.Graph.Operation("input_1").Output(0): tensor,
	},
	[]tf.Output{
    	t.model.Graph.Operation("predictions/Softmax").Output(0),
    },
	nil)


//Line 244
var tfImage [1][][][3]float32

for j := 0; j < imageHeight; j++ {
	tfImage[0] = append(tfImage[0], make([][3]float32, imageWidth))
}
for i := 0; i < imageWidth; i++ {
	for j := 0; j < imageHeight; j++ {
		r, g, b, _ := img.At(i, j).RGBA()
		tfImage[0][j][i][0] = convertValue(r)
		tfImage[0][j][i][1] = convertValue(g)
		tfImage[0][j][i][2] = convertValue(b)
	}
}

//line 256
func convertValue(value uint32) float32 {
	return (float32(value>>8) - float32(127.5)) / float32(127.5)
}
Like where the hell does “predictions/Softmax” come from or what is the convertValue function doing. There is other things from reading the code that does not make sense For example where does the model come form, While PhotoPrism is opensource the machine learning model (nasnet) download from their own servers and seems to be custom.
Creating my own Image Recondition API
So coming from a place of very little knowledge in this space, there are a lot of very confusing things. So lets rewind and start a new golang project and see what we can learn / build in a weekend.
Ok first we are going to need to install TensorFlow, this first requires the C bindings see here for install: https://www.tensorflow.org/install/lang_c We are also going to need some CLI tools from tensorflow project
pip install tensorflow
The final thing is the Go library due to reasons, you can not just do go get tensorflow We will use the awesome library tfgo it allows a simplified usage of the Go bindings and they maintain a fork that does allow for go get.
go get github.com/galeone/tfgo
go get github.com/galeone/tensorflow/tensorflow/[email protected]
We should now have a working TensorFlow go tool chain working. Next step choosing a model.
There exists a website https://tfhub.dev/ maintained by the TensorFlow/Google that is like docker hub but instead ML models.

You can choose your problem domain, so for this project it is image classification. You get presented with a load of options with various architectures. I have no clue if Resnet is better or worse then MobileNet, but I do what anyone does when they do not know, filter by downloads and choose the most popular one. Therefore with approaching half million downloads I choose imagenet/mobilenet_v2_100_224/classification I download the model and extract it into a folder in my golang project. It contains the following tree structure.
├── saved_model.pb
└── variables
    ├── variables.data-00000-of-00001
    └── variables.index
Now we have the model lets get our program to load it.
import
(
    tf "github.com/galeone/tensorflow/tensorflow/go"
	tg "github.com/galeone/tfgo"
)

func main() {
    //Gets rid of some annoying tensorflow warnings
    os.Setenv("TF_CPP_MIN_LOG_LEVEL", "2")

    modelName := "./imagenet_mobilenet_v2_100_224_classification_5"
    model = tg.LoadModel(modelName, []string{"serve"}, nil)
}
If you note in the above code we have an string slice with a single element “serve” this is a meta tag to load certain graph that is exported in the model
tagsis the set of tags with which to save the meta graph. In this case, since we intend to use the graph in serving, we use theservetag from predefined SavedModel tag constants. For more details, see tag_constants.py and related TensorFlow API documentation .
While “serve” is very common it could be anything as in PhotoPrism custom model has a tag of “photoprism” to find the name of the tag run the following command that will give you the info for the model
saved_model_cli show --all --dir imagenet_mobilenet_v2_100_224_classification_5/
The output will look something like the following. Note we will be referencing a load in this post:
MetaGraphDef with tag-set: 'serve' contains the following SignatureDefs:

signature_def['__saved_model_init_op']:
  The given SavedModel SignatureDef contains the following input(s):
  The given SavedModel SignatureDef contains the following output(s):
    outputs['__saved_model_init_op'] tensor_info:
        dtype: DT_INVALID
        shape: unknown_rank
        name: NoOp
  Method name is:

signature_def['serving_default']:
  The given SavedModel SignatureDef contains the following input(s):
    inputs['inputs'] tensor_info:
        dtype: DT_FLOAT
        shape: (-1, 224, 224, 3)
        name: serving_default_inputs:0
  The given SavedModel SignatureDef contains the following output(s):
    outputs['logits'] tensor_info:
        dtype: DT_FLOAT
        shape: (-1, 1001)
        name: StatefulPartitionedCall:0
  Method name is: tensorflow/serving/predict

Defined Functions:
  Function Name: '__call__'
    Option #1
      Callable with:
        Argument #1
          inputs: TensorSpec(shape=(None, 224, 224, 3), dtype=tf.float32, name='inputs')
        Argument #2
          DType: bool
          Value: False
        Argument #3
          DType: bool
          Value: False
        Argument #4
          batch_norm_momentum: TensorSpec(shape=(), dtype=tf.float32, name='batch_norm_momentum')
    Option #2
      Callable with:
        Argument #1
          inputs: TensorSpec(shape=(None, 224, 224, 3), dtype=tf.float32, name='inputs')
        Argument #2
          DType: bool
          Value: False
        Argument #3
          DType: bool
          Value: True
        Argument #4
          batch_norm_momentum: TensorSpec(shape=(), dtype=tf.float32, name='batch_norm_momentum')
    Option #3
      Callable with:
        Argument #1
          inputs: TensorSpec(shape=(None, 224, 224, 3), dtype=tf.float32, name='inputs')
        Argument #2
          DType: bool
          Value: True
        Argument #3
          DType: bool
          Value: False
        Argument #4
          batch_norm_momentum: TensorSpec(shape=(), dtype=tf.float32, name='batch_norm_momentum')
    Option #4
      Callable with:
        Argument #1
          inputs: TensorSpec(shape=(None, 224, 224, 3), dtype=tf.float32, name='inputs')
        Argument #2
          DType: bool
          Value: True
        Argument #3
          DType: bool
          Value: True
        Argument #4
          batch_norm_momentum: TensorSpec(shape=(), dtype=tf.float32, name='batch_norm_momentum')
Next stage is to get an image that we can send to the model. You would expect that this should just be get image from either a file or network and send to the model, but sadly it is more complicated then that. First the input image has to be a square 224px. Why 224px? I have no idea. from what I can see from a post on the fastAI forum
Objects often appear in the middle of an image in the ImageNet dataset. After 5 maxpools, a 224x224 will be 7x7 meaning that it will have a centerpoint. A 256x256 image will be 8x8 and not have a distinct centerpoint. There might be more, but this is what I remember.
But also I just seen people mentioned that the first CNN that worked use 224px so everyone else seemed to follow that process.Who knows but we need a square image that is not distorted, so using the imaging library we can perform this operation
img := imaging.Fill(srcImage, 224, 224, imaging.Center, imaging.Lanczos)
Next step is the input is not actually a image but rather a tensor.
A Tensor is a mathematical object similar to, but more general than, a vector and often represented by an array of components that describe functions relevant to coordinates of a space. Put simply, a Tensor is an array of numbers that transform according to certain rules under a change of coordinates. A Tensor can be defined as a single point, a collection of isolated points, or it may be defined as a continuum of points in which elements of the tensor are functions of position, and the Tensor forms what is known as a Tensor field. This means that rather than being represented by a single point, the tensor is defined at multiple points together in a space.
In our case that is basically a 4D array that represents 1D array of image data (x,y, RGB) The model website might tell you what the input is expecting. From Tensorflow Hub site our model has the following input
The input
imagesare expected to have color values in the range [0,1], following the common image input conventions. For this model, the size of the input images is fixed toheightxwidth= 224 x 224 pixels.
So along with the resize we will need to create this array and normalise each RGB value to between 0,1
var tfImage [1][][][3]float32
for j := 0; j < imageHeight; j++ {
	tfImage[0] = append(tfImage[0], make([][3]float32, imageWidth))
}

for i := 0; i < imageWidth; i++ {
	for j := 0; j < imageHeight; j++ {
		r, g, b, _ := img.At(i, j).RGBA()
		tfImage[0][j][i][0] = convertValue(r)
		tfImage[0][j][i][1] = convertValue(g)
		tfImage[0][j][i][2] = convertValue(b)
	}
}

func convertValue(value uint32) float32 {
	return (float32(value >> 8)) / float32(255)
}
Of note in the convert function you can see the “value » 8” this is because image RGB data is stored as a HEX encoded as uint32 so this needs to be converted back to base10 number like 255 for white, this is done by the binary shift operator. Also of note it seems the model that Photoprism is requires the input values to be normalised in a slightly different way which explains why there convert function is different
We can now send this tensor into the model and get some predictions hopefully.The following code executes the model with the normalised image we created above
results := model.Exec(
	[]tf.Output{
		model.Op("StatefulPartitionedCall", 0),
	},
	map[tf.Output]*tf.Tensor{
		model.Op("serving_default_inputs", 0): normalizedImg,
	},
)
When reading the PhotoPrism code we saw things like predictions/Softmax and above we have StatefulPartitionedCall These are Tensorflow Operations as described in the documentation
An
Operationis a node in a <code>tf.Graph</code> that takes zero or moreTensorobjects as input, and produces zero or moreTensorobjects as output
Or from https://www.altoros.com/blog/basic-concepts-and-manipulations-with-tensorflow/
Operation. Each Operation object represents a graph node, which is a unit of computation (addition, multiplication, or something more complex) performed on a tensor flow. It takes tensors as input and produces a tensor as output.
Now it would be a wonderful world if this information was clearly available in the docs or I don’t know have some standard naming convention like INPUT and OUTPUT. But no it seems the Data scientists will use what ever makes sense in their crazy minds. Any how rant over, how do we find out those names if you were not the person creating the model.Using the saved_model_cli command above we can see that our model has the following signature
signature_def['serving_default']:
  The given SavedModel SignatureDef contains the following input(s):
    inputs['inputs'] tensor_info:
        dtype: DT_FLOAT
        shape: (-1, 224, 224, 3)
        name: serving_default_inputs:0
  The given SavedModel SignatureDef contains the following output(s):
    outputs['logits'] tensor_info:
        dtype: DT_FLOAT
        shape: (-1, 1001)
        name: StatefulPartitionedCall:0
  Method name is: tensorflow/serving/predict
In the signature we can see that the input has the name serving_default_inputs and the output as StatefulPartitionedCallIf we output the results you notice it is just an list of floats (probabilities) that the model gave us for what it thinks the image is classified as, higher the number more certain it is. But if you notice there is no string containing the label that the probablity corresponds to and there is no way to extract this from the model. PhotoPrism download does contain a label file but our model does not. Why ? Again I have not the foggiest, if I download the model from the hub I would have expected to get the labels, sigh. Back on the website in the description and scroll down you can find some information about the output of the model and finally a link to the labels
The output is a batch of logits vectors. The indices into the logits are the
num_classes= 1001 classes of the classification from the original training (see above). The mapping from indices to class labels can be found in the file at download.tensorflow.org/data/ImageNetLabels.txt (with class 0 for “background”, followed by 1000 actual ImageNet classes).
Download the label file and we will create a slice to store the list of labels.
func loadLabels(path string) error {
	modelLabels := path + "/labels.txt"
	f, err := os.Open(modelLabels)
	if err != nil {
		return err
	}
	defer f.Close()
	scanner := bufio.NewScanner(f)
	for scanner.Scan() {
		labels = append(labels, scanner.Text())
	}

	if err := scanner.Err(); err != nil {
		return err
	}

	return nil
}
We can now use this list with the output of the model to get the classification of a model each model seems to have different thresholds. I picked 5 but was just down to experimentation, it will depend on how certain the model and how many increasingly inaccurate labels you want
probabilities := results[0].Value().([][]float32)[0]
	classifications := []classification{}
	for i, p := range probabilities {
		if p < 5 {
			continue
		}
		classifications = append(classifications, classification{
			Label:      strings.ToLower(labels[i]),
			Proability: p,
		})
		labelText := strings.ToLower(labels[i])
		fmt.Printf("%s %f \n", labelText, p)
	}
Putting it all together
package main

import (
	"bufio"
	"encoding/json"
	"fmt"
	"image"
	"image/jpeg"
	"io"
	"log"
	"net/http"
	"os"
	"runtime/debug"
	"strings"

	"github.com/disintegration/imaging"

	tf "github.com/galeone/tensorflow/tensorflow/go"
	tg "github.com/galeone/tfgo"
)

var (
	model  *tg.Model
	labels []string
)

func loadLabels(path string) error {
	modelLabels := path + "/labels.txt"
	f, err := os.Open(modelLabels)
	if err != nil {
		return err
	}
	defer f.Close()
	scanner := bufio.NewScanner(f)
	for scanner.Scan() {
		labels = append(labels, scanner.Text())
	}

	if err := scanner.Err(); err != nil {
		return err
	}

	return nil
}

func main() {
	os.Setenv("TF_CPP_MIN_LOG_LEVEL", "2")

	modelName := "./imagenet_mobilenet_v2_100_224_classification_5"
	loadLabels(modelName)
	model = tg.LoadModel(modelName, []string{"serve"}, nil)

	log.Println("Run RECOGNITION server ....")
	http.HandleFunc("/", mainHandler)
	err := http.ListenAndServe(":8080", nil)
	if err != nil {
		log.Fatalln(err)
	}
}

type classification struct {
	Label      string
	Proability float32
}

func mainHandler(w http.ResponseWriter, r *http.Request) {
	normalizedImg, err := createTensor(r.Body)
	if err != nil {
		log.Fatalf("unable to make a normalizedImg from image: %v", err)
	}

	results := model.Exec(
		[]tf.Output{
			model.Op("StatefulPartitionedCall", 0),
		}, map[tf.Output]*tf.Tensor{
			model.Op("serving_default_inputs", 0): normalizedImg,
		},
	)

	probabilities := results[0].Value().([][]float32)[0]
	classifications := []classification{}
	for i, p := range probabilities {
		if p < 5 {
			continue
		}
		classifications = append(classifications, classification{
			Label:      strings.ToLower(labels[i]),
			Proability: p,
		})
		labelText := strings.ToLower(labels[i])
		fmt.Printf("%s %f \n", labelText, p)
	}
	w.Header().Set("Content-Type", "application/json")
	json.NewEncoder(w).Encode(classifications)
}
func createTensor(image io.ReadCloser) (*tf.Tensor, error) {
	srcImage, _ := jpeg.Decode(image)
	img := imaging.Fill(srcImage, 224, 224, imaging.Center, imaging.Lanczos)
	return imageToTensor(img, 224, 224)
}
func imageToTensor(img image.Image, imageHeight, imageWidth int) (tfTensor *tf.Tensor, err error) {
	defer func() {
		if r := recover(); r != nil {
			err = fmt.Errorf("classify: %s (panic)\nstack: %s", r, debug.Stack())
		}
	}()

	if imageHeight <= 0 || imageWidth <= 0 {
		return tfTensor, fmt.Errorf("classify: image width and height must be > 0")
	}

	var tfImage [1][][][3]float32

	for j := 0; j < imageHeight; j++ {
		tfImage[0] = append(tfImage[0], make([][3]float32, imageWidth))
	}

	for i := 0; i < imageWidth; i++ {
		for j := 0; j < imageHeight; j++ {
			r, g, b, _ := img.At(i, j).RGBA()
			tfImage[0][j][i][0] = convertValue(r)
			tfImage[0][j][i][1] = convertValue(g)
			tfImage[0][j][i][2] = convertValue(b)
		}
	}
	return tf.NewTensor(tfImage)
}

func convertValue(value uint32) float32 {
	return (float32(value >> 8)) / float32(255)
}
Now in postman I send a post to http://localhost:8080 with the following image:
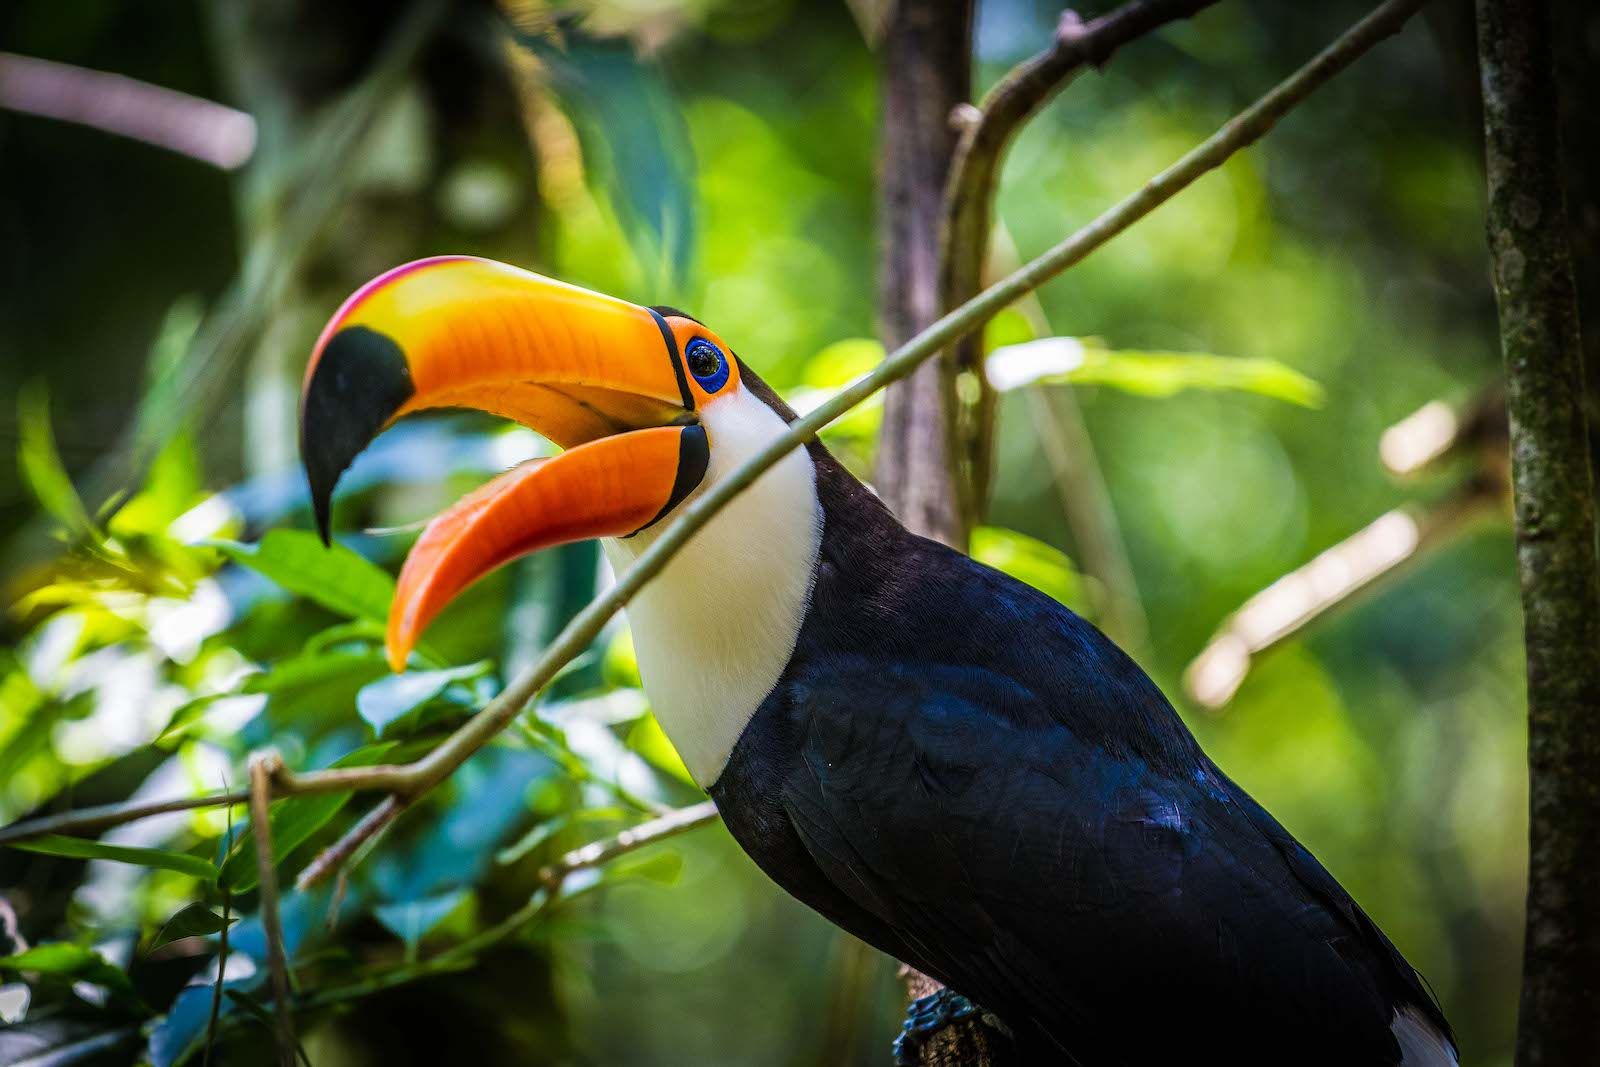
I get the follow successfully result.
[
{"Label":"hornbill","Proability":5.1148653},
{"Label":"toucan","Proability":8.605384}
]
In review looking again at PhotoPrism code it is now much clearer how it works and what it is now doing, but interesting is that the ML stuff is not public as they are using a custom model based of the Nasnet model where its documentation is much more limited. It is also clearer that you can not just switch out models as since the input can be different expecting the image to normalised in a different way. I hope this post has been useful to anyone else that comes across it for how to get TensorFlow and go working and using public machine learning models, Its been a interesting weekend to learn all of this stuff.